
Getting Started with Adobe® Photoshop® *
Starting the application
1. Start Photoshop by locating it under "Programs" from the Windows start button. It can typically be found from the "Start" button, under Programs/Adobe, though in the IT lab, it is likely to be under the CPSC-applications, submenu.
Upon starting, your screen should look vaguely like:
If they are open (as shown above), then close up the little boxes on the right: the "Navigator," "Colors", and "Layers" boxes. They are merely confusing (for now). Do this by clicking the mouse on the little box marked x in the upper corner of each.
Starting a new file
1. Start your own original "painting" by going to the "file" menu and choosing "new" as shown below:
Opening an existing file
1. Sample images from Adobe.
Copyright laws notwithstanding, Adobe itself provides (under what may be considered to be an "implicit license") certain "sample" images with which you may practice. These are located within a "Samples" directory inside the Adobe Photoshop installation on your lab machine (try looking in Photoshop\Goodies\Samples). Use the Open option from the File menu and point it at one of these.
Please be aware that while these images may prove quite useful in practicing with the program, a) they are copyrighted, b) they are not your original work and c) using them as a substitute for your own work is likely to get you in trouble.
2. using public domain images.
a. Open a web browser (like Netscape or Microsoft Internet Explorer) and go to http://srufaculty.sru.edu/david.dailey/public/public_domain.htm (for a list of other places where you might find usable material, see here -- also please let me know via e-mail of other sites containing reputable public domain material.)
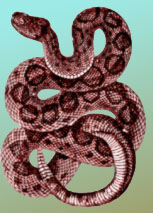
b. Go into the "reptiles" heading and choose "rattlesnake."
3. Use the right Windows-mouse-button to click on the beast (specifically on the gif file containing the depiction of the beast) and, lo, a funny little XWindows/Andrew/IBM like menu will pop-up. Choose "copy" – one of the options in said window. This makes a copy of the image into your "clipboard." The copy is considered non-infringing of copyright, since the image’s copyright (once held by Webster) has lapsed (being older than 75 years). Those who scanned the image, being academics, are of the opinion that scanning artwork does not convey sufficient originality to convey a new copyright over the digitized form. Others might disagree, but as the person overseeing the work, consider the sentence you are currently reading to be written permission to use the material in perpetuity and throughout the universe (given that proper citation, is of course, given).
Your screen will now look something like this:

You may now want to "zoom" in a bit (using the magnifying tool).
Now let’s play a bit:
1. Convert it to RGB (from greyscale). Go ahead and "flatten" along the way. (Listen for what this means during lecture.)
2. Select the whole image:
Little moving lines should now appear in a rectangle all around the image.
3. Copy the thing to the clipboard again just to make sure you still have a copy.
Now let’s colorize it.
4. Choose hue and saturation from the adjust option in the image menu:
5. Click the Colorize checkbox in the dialog which appears, and play with the sliders a bit:

Shrink it down to a reasonable size:
Save and display the results:

jpeg and gif versions
Other links:
case studies using Photoshop comparison of gif and jpg making and using screenshots
(9/13/06-dpd)
* Note: I am seeking permission for use of Adobe® trademarks, screen shots, and the like as contained in various statements by that corporate entity (e.g. http://www.adobe.com/misc/pdfs/USGenExtTMdb022803.pdf, http://www.adobe.com/misc/permissions.html, http://www.adobe.com/misc/agreement.html, and http://www.adobe.com/misc/trademarks.html ) though the reader might wish to be aware that such permission statements do exist before replicating any marks associated with software companies.